


Flexfire LEDs customer Don Bickley recently installed our ColorBright™ Natural White LED strip lights to provide task and ambient illumination in his unique travel trailer. Pleased with the product quality and service he received, Mr. Bickley felt inspired to write a rather thorough review on his blog. The review is part of a longer piece in which he provides great detail of his travel trailer LED strip light installation. We’ve excerpted some of it for you here below; head over to Explore With Don for his full review. Review Of Colorbright™ Natural White LED Strip From Flexfire LEDs, Inc. I was creating a map board in my travel trailer (TT) and I needed much better lighting than what I currently had. This is a review on an LED light strip that I chose. I installed the strip lighting under a cabinet for map board illumination in my TT cargo bay, and I installed 3 separate strips on the ceiling for general “room” lighting. At the bottom of this page is a link to my article detailing how I did this upgrade. I never much thought of using LED strip lighting before, but I’m now solidly sold on the idea. The install went easily, quickly, and I’m very satisfied with the results. There are many LED sellers out there, but I found FlexFireLEDs.com’s LED Lighting Specialist Ruy Lopes very informative and pleasant to deal with. Never once did he make me feel like I was wasting his time. He answered my questions, gave me advice, and guided me along. After much research (as always), I decided on FlexFire LEDs’ Colorbright™ LED strip light; based on Ruy’s recommendation, but also on the specs. They have light strips for nearly any type of application, whether that be for recreational, household, outdoor, or commercial needs. Other facts that persuaded me:...
Understanding The Different Numbers Used In LED Strip Lights...
posted by Flexfire LEDs
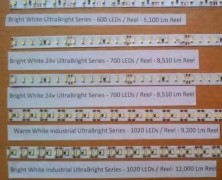
When shopping for LED strip lights, you’ll regularly come across numbered terms such as 3020, 3528, and 5050. So what do these numbers mean, and why are they important in your buying process? This simple explanation will help you in understanding the different numbers used in LED strip lights. First, a basic understanding of how the strips themselves are constructed. The LED chips are mounted onto a thin, flexible metal strip that acts as a heat sink, drawing heat from the light chips and allowing them to remain cool during operation. This construction accounts for the “SMD” you’ll often see in strip light specifications, which stands for Surface Mount Device. The four-digit designation refers to the dimensions of the chip itself, in millimeters. A 3528 chip, for example, measures 3.5mm by 2.8mm, while a 5050 chip is 5.0mm by 5.0mm square. These different sizes dictate how many chips can be placed on a strip, which in turn determines its particular light qualities. Each has its benefits, so let’s break them down one at a time. The 5050 chips that Flexfire LEDs uses are actually composed of 3 light diodes, a construction sometimes referred to as a tri-chip. With 3 diodes, a 5050 chip will be brighter than other chips with one individual diode. But while a tri-chip is theoretically three times brighter, their larger size means fewer of them will fit onto a strip’s PCB (Printed Circuit Board). It also means they will generate more heat, requiring a thicker PCB to act as a heat sink. Finally, a tri-chip can be constructed with different types of diodes in the same chip, generating unique visual results. The three diodes can be combined to create millions of different color combinations, making them an excellent choice for...
How To Install Under Cabinet LED Strip Lighting...
posted by Flexfire LEDs
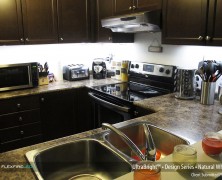
Under cabinet lighting is one of the most common applications of LED strip lights. This relatively easy installation is a fantastic addition to any kitchen, office, or work bench area that would benefit from high quality direct task lighting. To illustrate this installation, we’ve put together this step-by-step tutorial on how to install under cabinet LED strip lighting. For this tutorial, we reached out to a customer named Owen in Toronto, Canada. Owen was seeking bright, usable light in his kitchen that could be hard-wired to a standard wall dimmer, and told us he had been, “scouring the web off and on for three years” in search of the perfect solution. In the end, he chose Flexfire LEDs UltraBright LED strip lights in natural white after viewing some of our online installation videos and feeling comfortable with our product quality. It’s important to note that for this installation, Owen enlisted the help of a licensed professional electrician. This is something we recommend for all installations, as it ensures code compliance and avoids potential injuries due to improper handling. Here is a “before” photo of his kitchen, using only the existing overhead lighting. And now, onto the installation! In order to achieve proper brightness and even light distribution, he used our solderless connectors to run two parallel sections of LED strip lights under each of three cabinet sections. In the end, he felt that one single strip would have been more than enough, and this parallel run wasn’t actually necessary. Also, note that the strip lights are very thin and low profile – the strips themselves are only actually visible when viewed from below as photographed here. As Owen says, “The low profile design means I don’t even have to rush to add a valence.”...
Flexfire LEDs Spring 2014 Photo Contest...
posted by Flexfire LEDs
We take pride in helping customers complete all sorts of LED lighting installations. From restaurants and hotels to basic kitchen redesigns, each project has a unique story. For this reason, we are always eager to see photographs of completed projects using Flexfire LEDs strip lights. To this end, we encourage you to participate in the Flexfire LEDs Spring 2014 Photo Contest. Every Entry Wins! We now have two separate contests, and everyone who submits a qualifying entry will win! Our standard photo contest awards prizes in each of three categories, while our new “Step-by-Step Tutorial” contest rewards those who share thorough details of their projects. Furthermore, everyone who sends us a qualifying submission for either contest will receive a coupon for $30 off any reel of Flexfire LEDs strip lights. Below you’ll find details for each of our two contests. Contest 1: Photo Contest Send us a high-resolution photograph of your completed project using Flexfire LEDs products and we’ll reward you with a coupon for $30 off any reel of Flexfire LEDs strip lights. One winner will be selected in each of these three categories: 1. Best Residential Installation (kitchens, bedrooms, bathrooms, basically anywhere in your home) 2. Best Commercial Installation (retail stores, bars/restaurants, offices, signage, etc.) 3. Best Hobby/Creative Installation (past examples include terrariums, Halloween costumes, and a flying wingsuit!) The winning project in each category will receive a FREE reel of Flexfire LEDs ColorBright strip lights. Again, please be sure to send us a high-resolution photograph, as blurred, low-quality images will not be considered. Contest 2: Step-by-Step Tutorial Contest Many of our customers see these great project photos and wonder, “How did they do that?” We’d love to share your step-by-step installation story on our blog. Everyone who submits a qualifying “Step-By-Step Tutorial” entry will receive a...
Why You Should Care About CRI...
posted by Flexfire LEDs
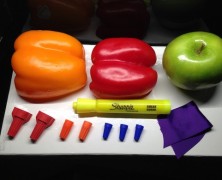
CRI, or Color Rendering Index, is the latest buzzword in consumer lighting circles. With the current phasing out of traditional incandescent bulbs, many consumers are scrambling to understand their remaining choices. Savvy lighting manufacturers understand this, and have invested a great deal in educating customers about things like color temperature, lumens, and now CRI. So how does CRI work? Basically, take a light bulb and shine it onto a few bright, colorful items. How natural do their colors look? Color Rendering Index is a mathematical measure of this, where a light source is tested and given a score from 0-100. Any light bulb, tube, or strip that measures greater than 90 is typically considered “High CRI”, and thus very effective at rendering natural-looking color at a given color temperature. As a point of reference, many of the fluorescent or other types of lighting that people consider “harsh” or “artificial” measure in the 50-70 CRI range. Take a look at the two photos above. In the first photo, under lights rated at CRI 57, the orange bell pepper has lost much of its natural color, appearing almost yellow. Similarly, the green apple, red bell pepper, and yellow marker appear dull and lifeless. In the second photo, under CRI 93 lighting, the colors are much more alive in comparison, down to the white board on which everything is placed. Testing for CRI requires special machinery designed specifically for this purpose. During this test, a lamp is shone onto eight different colors (or “R values”), termed R1 through R8. The lamp receives a score from 0-100 for each color, based on how natural the color is rendered in comparison with how the color looks under a “perfect” or “reference” light source at the same color temperature...