


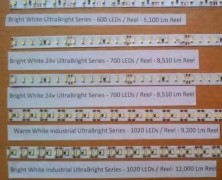
When shopping for LED strip lights, you’ll regularly come across numbered terms such as 3020, 3528, and 5050. So what do these numbers mean, and why are they important in your buying process? This simple explanation will help you in understanding the different numbers used in LED strip lights. First, a basic understanding of how the strips themselves are constructed. The LED chips are mounted onto a thin, flexible metal strip that acts as a heat sink, drawing heat from the light chips and allowing them to remain cool during operation. This construction accounts for the “SMD” you’ll often see in strip light specifications, which stands for Surface Mount Device. The four-digit designation refers to the dimensions of the chip itself, in millimeters. A 3528 chip, for example, measures 3.5mm by 2.8mm, while a 5050 chip is 5.0mm by 5.0mm square. These different sizes dictate how many chips can be placed on a strip, which in turn determines its particular light qualities. Each has its benefits, so let’s break them down one at a time. The 5050 chips that Flexfire LEDs uses are actually composed of 3 light diodes, a construction sometimes referred to as a tri-chip. With 3 diodes, a 5050 chip will be brighter than other chips with one individual diode. But while a tri-chip is theoretically three times brighter, their larger size means fewer of them will fit onto a strip’s PCB (Printed Circuit Board). It also means they will generate more heat, requiring a thicker PCB to act as a heat sink. Finally, a tri-chip can be constructed with different types of diodes in the same chip, generating unique visual results. The three diodes can be combined to create millions of different color combinations, making them an excellent choice for...
How To Install Under Cabinet LED Strip Lighting...
posted by Flexfire LEDs
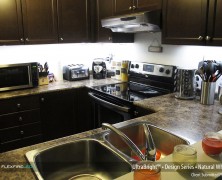
Under cabinet lighting is one of the most common applications of LED strip lights. This relatively easy installation is a fantastic addition to any kitchen, office, or work bench area that would benefit from high quality direct task lighting. To illustrate this installation, we’ve put together this step-by-step tutorial on how to install under cabinet LED strip lighting. For this tutorial, we reached out to a customer named Owen in Toronto, Canada. Owen was seeking bright, usable light in his kitchen that could be hard-wired to a standard wall dimmer, and told us he had been, “scouring the web off and on for three years” in search of the perfect solution. In the end, he chose Flexfire LEDs UltraBright LED strip lights in natural white after viewing some of our online installation videos and feeling comfortable with our product quality. It’s important to note that for this installation, Owen enlisted the help of a licensed professional electrician. This is something we recommend for all installations, as it ensures code compliance and avoids potential injuries due to improper handling. Here is a “before” photo of his kitchen, using only the existing overhead lighting. And now, onto the installation! In order to achieve proper brightness and even light distribution, he used our solderless connectors to run two parallel sections of LED strip lights under each of three cabinet sections. In the end, he felt that one single strip would have been more than enough, and this parallel run wasn’t actually necessary. Also, note that the strip lights are very thin and low profile – the strips themselves are only actually visible when viewed from below as photographed here. As Owen says, “The low profile design means I don’t even have to rush to add a valence.”...